
I’ve always been a doodler, whilst on the phone or compiling lists but my doodles were always a bit disappointing, hearts, flowers, smiley faces… However I’ve recently discovered the phenomenon of adult colouring books (or zendoodling to give it it’s proper grown up name) and have rediscovered my love of drawing.
I have a creative daughter so I bought a colouring book for us to try together. The one I chose had finished designs to colour in and also half finished ones for you to doodle on yourself. This was a revelation to me – I could teach myself to do better doodles and once you’ve learnt a few simple techniques, it really is very easy.
Zendoodling is a process of creating beautiful designs by drawing repeated patterns. It is believed to increase focus, unlock creativity and relax the mind into a Zen like state of meditation. The finished pieces look very intricate but you take it step by step, adding one simple pattern at a time. There are no set rules on how to create your design but the best way to start is to look at other designs for inspiration. There are loads on pinterest, or try watching an online tutorial on youtube to see how the design builds. You don’t need any special equipment or skills so it can also be done at anytime, anywhere and on anything!
A few years ago I started upcycling furniture, breaking away from being stuck to my computer as a graphic, this released some of my ‘inner artiness’ that had been bubbling away inside and gave me the confidence to pick up a paintbrush again. But faced with a blank piece of paper I was flummoxed! Creating these doodles increased my confidence in my artistic abilities. I’ve got a degree in fine art but it was a long time ago and I don’t think I’ve actually picked up a pen and drawn anything freehand since leaving university, I’d lost the creativity and the freedom that is innate in all children, the ability to just draw.
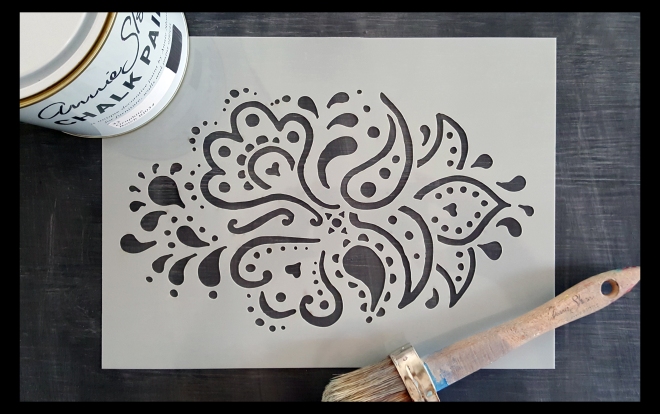
My new found doodling skills got me thinking about ways to decorate the furniture that I upcycle. I have created a few stencils for furniture but these have been based on geometric patterns or drawn up on the computer. I wanted to try and create something less structured, more freehand. I spent a very relaxing evening doodling, it’s amazing how the time disappears when you get in the zone, and I created a henna inspired doodle that I could then turn into a stencil. I really enjoyed the process and I’m looking forward to some more creative meditation time trying out some different designs, whenever I catch another elusive free evening. I used my new stencil on top of a small side table that I had just finished painting. It already had ornate detailing on the drawers and legs and the stencil on the top finished it off perfectly.


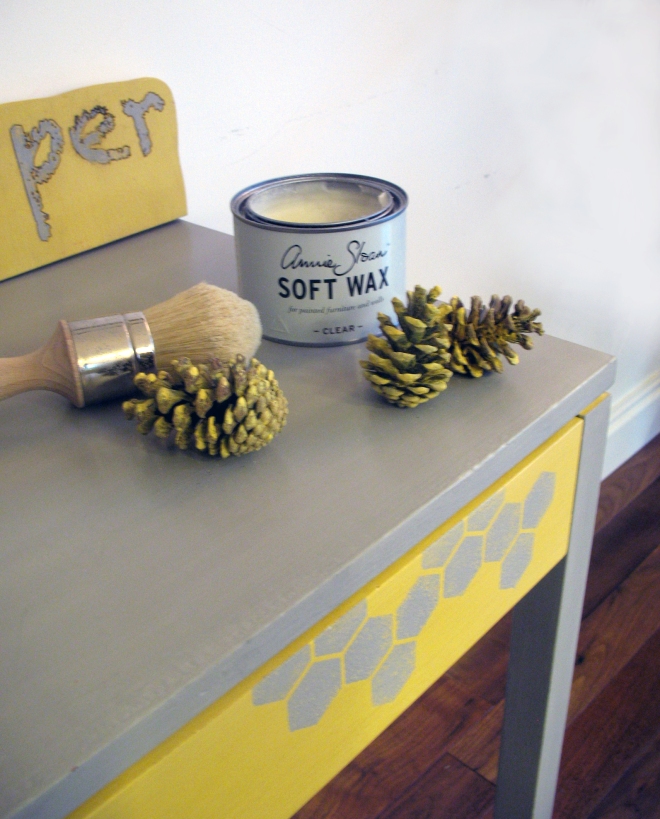
Stenciling is a really quick and easy way to customise and add your own style around the home, you can use stencils on tabletops, drawer fronts, on fabric or even on the walls! I have created stencils for my upcycles with inspirational messages or personalised designs and imagery for a client that means something special to them.
Start by securing the stencil to the object you are painting, you can use a low tack adhesive or apply masking tape along the edges of the stencil. For best results invest in a stencil brush a specialist brush with short, firmly packed bristles. They are available in various widths, from small for tiny, detailed sections of a stencil to large ones for faster painting of larger sections.
The main advantage of a stencil brush over a normal paintbrush is that it reduces the chances of getting paint under the edge of the stencil because of the stiff bristles.
If you’re painting a border stencil with several colours, you may find it easier to have a brush for each colour, rather than rinsing the brush each time.
Use a dry brush and keep the amount of the paint on the brush to a minimum. Dip the brush into the paint, I use Annie Sloan Chalk Paint, other paints are available but this is my favourite and is great for stenciling as it is quite thick, wipe off any excess paint onto a piece of newspaper, if you have too much paint on the brush, or it is too liquid it will bleed through underneath the stencil. Dab at the stencil in a vertical, up and down motion think of a woodpecker movement! As not much paint is used the stenciled area dries quickly, the stencil can usually be reused straight away, if you are doing a repeated pattern just check that no paint has bled through underneath the stencil before starting again. Once you are finished wash the stencil off carefully, my top tip for doing this is to turn your washing up bowl upside down, use this to support the stencil and wash it over with the stencil brush. This makes sure you don’t damage the stencil, which may be delicate on detailed sections and also washes out your brush at the same time, leave to dry and it will be ready for your next project!
I would love to hear about any upcycling projects that you have done, or if you would like any tips or advice then please get in touch. You can email me at angela@harperandharper.co.uk or look me up on Facebook (search for harperandharper). If I have inspired you to have a go at stenciling I sell my customised stencils on Etsy.co.uk
First published in Antiques Plus, West Country Life magazine 14.05.16
